Connect Your Database
You’ve created your app on Apper. But right now, nothing gets saved. It’s all just visuals.
To make your app actually work (save information, show users their data, handle logins, and enable real-time updates), you need:
- Database: Where your app stores information
- Backend: How your app uses and manages that information
Why it Matters
| Without a database + backend | With both database + backend connected |
|---|---|
| Forms don’t save anything | Your app saves, loads, and updates live data |
| Lists can’t show real data | Every button, form, and list becomes functional |
| Users can’t log in | Users can login, see their data, and even use your app |
| Pages won’t update | You can track everything securely and reliably |
| Your app looks good… but does nothing | You get a real, working system, not just a prototype |
Steps to Connect Database
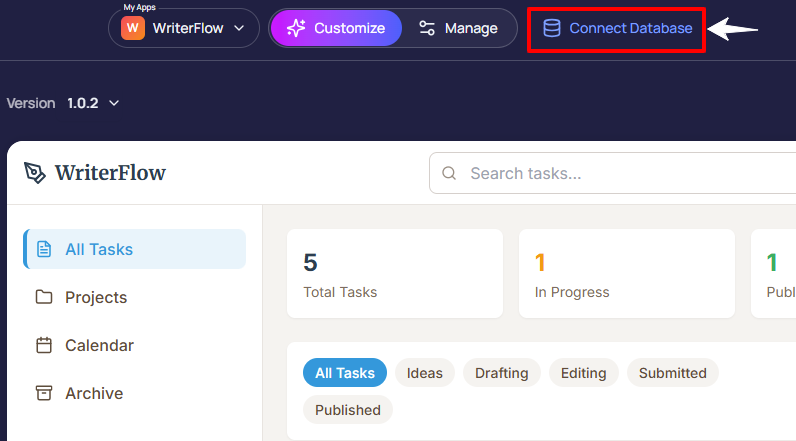
Step 1: Click “Connect Database”
This tells Apper: “Hey, I want this app to start saving and managing real data.”
It triggers a process to prepare your app for real use.
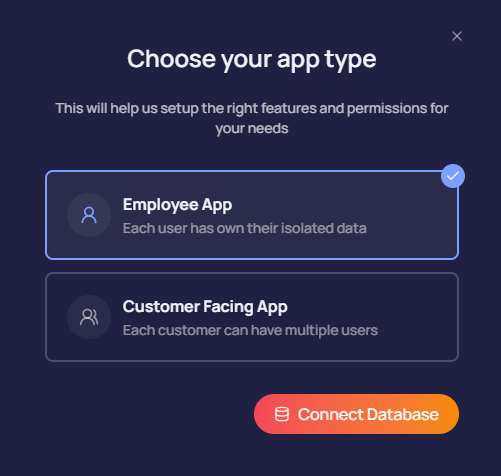
Step 2: Choose Your App Type
Why does this matter? Because different apps have different rules for who can see and use the data.
You’ll choose between:
-
Employee App: Each user sees only their own data
e.g., a worker sees only their own shifts -
Customer App: Multiple users under one account can share data
e.g., a manager and their team can all see the same schedule
This helps Apper keep your data safe, and make sure only the right people can access and manage it.
Step 3: Apper Sets Up the Database
Once you select the app type, Apper analyzes your app to:
- ✅ Create smart tables based on your idea (e.g., Employees, Bookings, Products)
- ✅ Add useful fields to each table (like name, email, created by, updated, owner)
- ✅ Link related data together (e.g., connect a user to their orders or tasks)
- ✅ Sync everything in real time
No manual setup required! Data structure, logic, and relationships are handled automatically by Apper.
Step 4: Apper Sets Up the Backend
Your app consists of 3 essential parts:
- UI – How your app looks
- Database – Where your app stores data
- Backend – How your app functions
To make your app function, the backend connects your UI and database. It’s the system that makes things happen:
- Saves form data to the right table
- Fetches data and displays it in your app
- Updates and deletes records when users make changes
- Checks who the user is and what they’re allowed to do
- Shows only the right data to the right users
- Validates input before saving (e.g., required fields, formats)
- Handles data privacy rules for each field (e.g., hidden or read-only fields)
- Keeps everything updated live with no refresh needed
- Connects buttons, forms, and lists to the exact field in the database
- Handles login-based access control securely and instantly
Apper sets up all the backend automatically - you don't need to write a single line of backend code.
In traditional app development, building a backend takes time, code, and testing. But in Apper:
- You don’t write any API calls
- You don’t create server files
- You don’t manage data syncing or roles
It’s all handled for you, automatically and instantly.
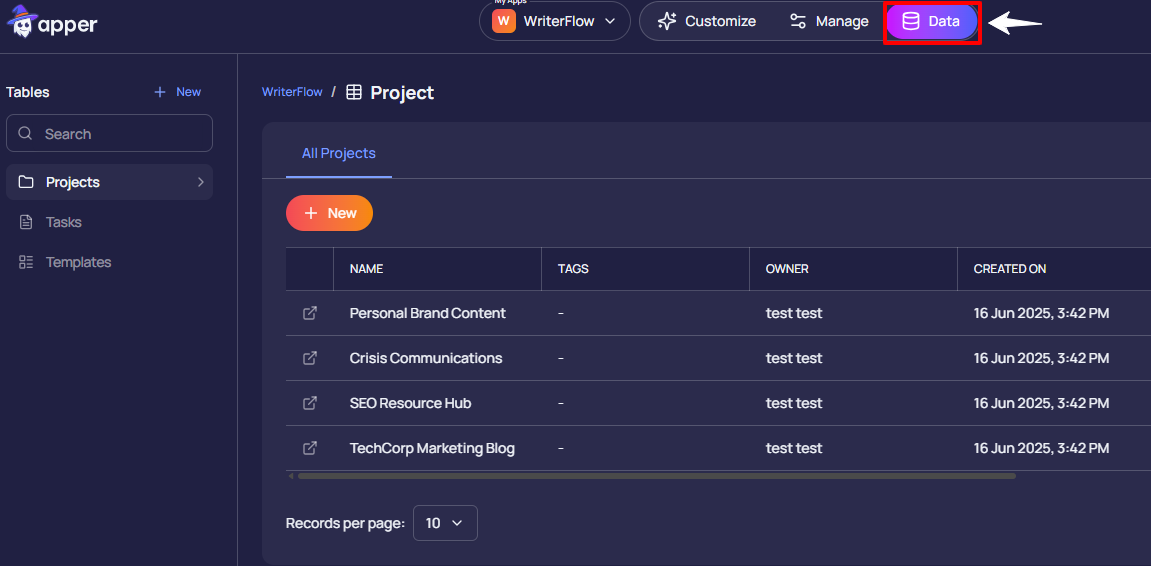
Step 5: View and Manage Your App Data
Once the database and backend are in place, you’ll see the “Data” tab at the top.
This is where you can view, add, edit, and manage your app’s data, all in one place.
It works like a spreadsheet, but it's fully connected to your live app.
You can:
- Add new records (like employees, shifts, tasks, etc.)
- Edit or delete existing entries
- Search and filter data
- See when a record was created or last updated
- Track who created or owns each item
Any changes you make here are reflected instantly in your app.
Step 6: Your App Is Now Fully Functional
At this stage, your app is no longer just a layout. It's a fully-working system where:
- Users can sign up or log in
- Forms store data in the backend
- Lists and dashboards show live entries
- Everything updates in real time
- Each user sees only what they’re supposed to
You didn’t have to write any backend code. You didn’t have to build your own database.
You just clicked “Connect Database” - and Apper took care of everything.